wait, what
#intro #explanation #whatsthis
@crltt on 06/12/23
Dear fellow reader,
human or synthetic, welcome to the b.log.You might be asking yourself:"what?!thehell".well [i] hope to clarify your doubts. This is a log of thoughts, a blog, a journal, but to put it simply, [i] was looking for something that could help me note-take, so this section was born. This will be used as some form of public note taking with the main purpose of reminding me things; [i] always prefer being private, so for it to be public is quite a big step. The hope is to be somewhat useful, someday, to someone. Generally, here, you'll find my journey through many interests, for which, different alter egos will be used to explicate. If you please, you can meet them here.
b y e
qwerty --> colemak-dh
#sw #hw #solder #keyboard #zmk #splitkb #ergo
@timmin on 21/02/24
not long ago my neck stiffness and back-shoulder pain was getting incredibly severe, this, on top of the already growing wrist pain [i] was experiencing, forced me into looking closely at my workplace ergonomics. It didn't took long to find the major cause of this distress, my bad posture mostly due to my keyboard. If it isn't clear enough, what [i] am about to write is my journey through keyboard ergonomics, from inception, to research, to switching and finally present days. The hope is to give the reader a light to follow, as switching your keyboard layout can be quite a daunting process.
research it is fair to say that, before entering the process, [i] already had quite an interest on keyboards. As you soon will discover, [i] tend to use the keyboard for most of my computer needs. [i] hate having to move my hands between it and the mouse, [i] generally tend to use the terminal quite extensively as [i] hate the modern input methods found on current generation operating systems. [i] think clicking around in your GUI to find a file it's extremely inefficient for most scopes and for that reason [i] tend to use the keyboard quite a lot. ( P.S. :: [i] will expand on this subject in a future article about my arch linux build ). Because of this, even before the whole ergonomic keyboard journey started [i] was familiar with building classic MX mechanical keyboards as since it's my favourite input method, [i] seek a more satisfactory item to use. Unfortunately those choices just made the issue more severe and that's when [i] started researching deeply workspace ergonomics. This intro was just to point out that going into this process [i] already had assembled my own custom mechanical keyboard, no soldering, but [i] was already familiar with components and process, albeit on a very superficial way. My research then didn't touch any of these aspects, [i] already knew roughly how keyboards works and are made, it is probably worth, if you, the reader, are planning to switch, to research a little how classic mechanical keyboard works. That said, after reading numerous ergonomics articles i was convinced that, for the most part, my bad posture was caused by the keyboard. When using a 100% classic keyboard, the resting position forces the user to have the hands close to each other. This tends to make the user close up their shoulder blade and with time arching like a goblin sucked in by the screen. [i]'ve seen countless of images showing you how to assume a correct posture, but with classic setups, [i] believe, it's simply unachievable. Of course if you pay attention to your posture every second you might be able to achieve it, but who does that?!, soon enough the work you're performing will distract you and you will end up glued to the screen. [i] believe that to be able to keep a good posture we need to start from a setup that effortlessly allows us to maintain it without having to think about it and the keyboard, alongside monitor height, are the most important aspects of the setup.
benefit of a split keyboard
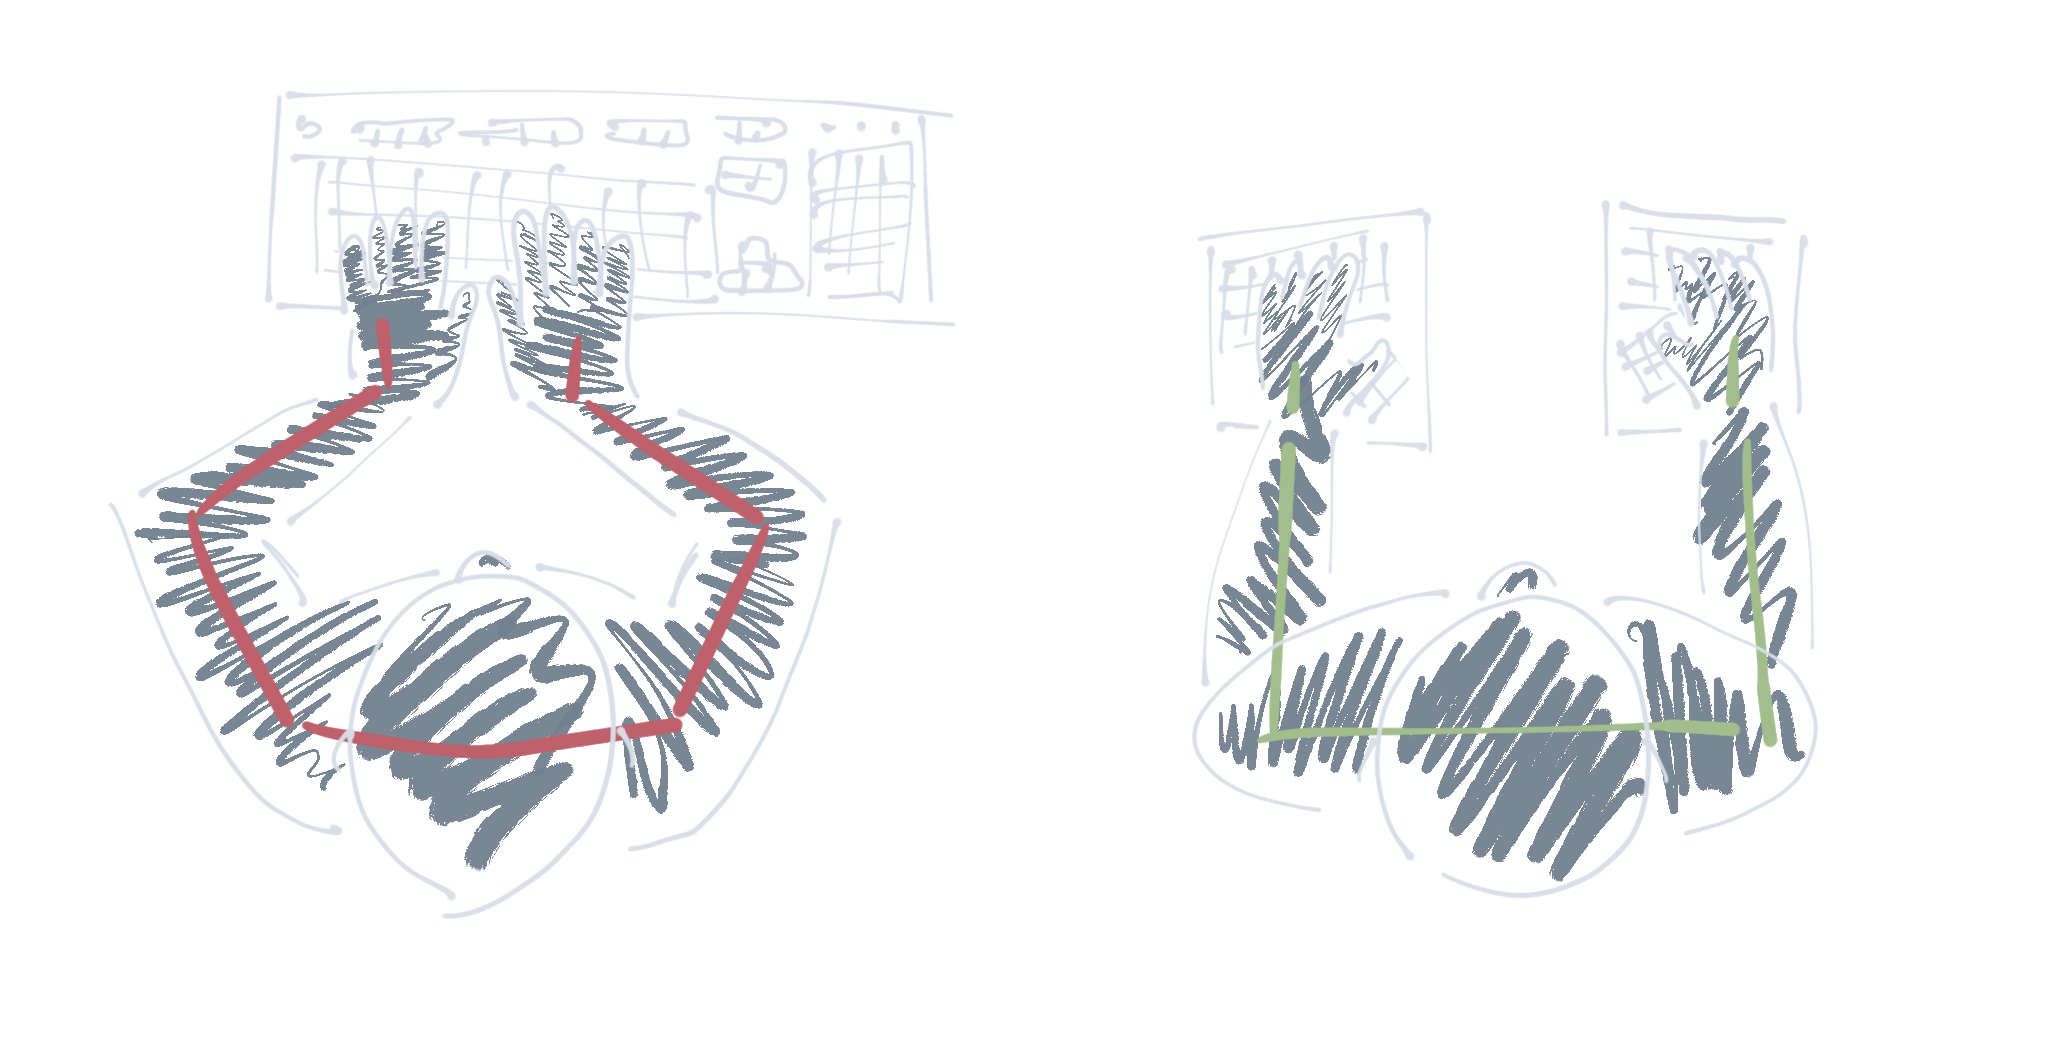
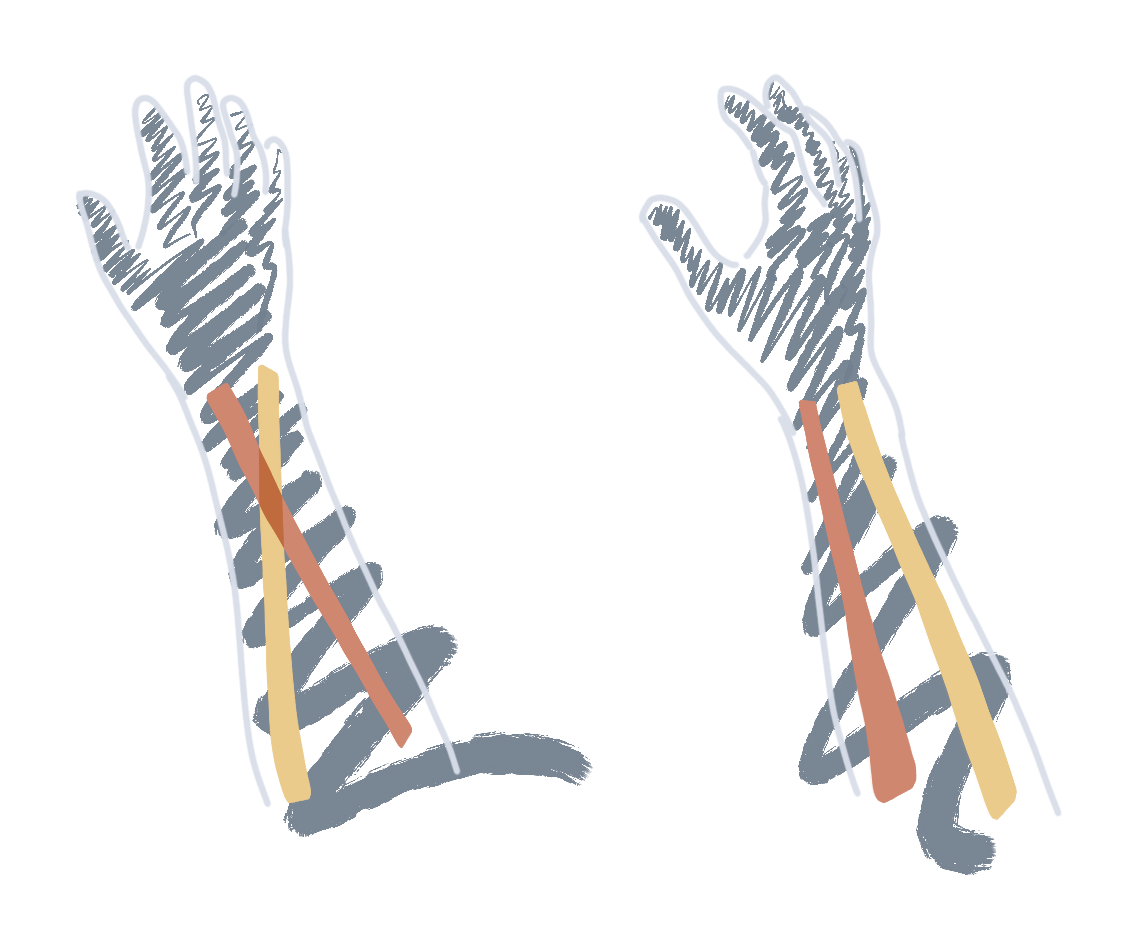
What [i]'ve found out with my research is that splitting your keyboard in half is what, most of all, helps with a better posture. It is, [i] believe, the easiest and most effective change to your setup you can do. Being able to spread the hands apart helps shoulders strain by keeping them open and avoid leaning forward, it does, naturally, help with your posture, without even trying, without having to think about it. Your wrists will also thank you as splitting your keyboard greatly helps avoiding Unlar deviation. Not all roses though, using a split keyboard poses some challenges, most notably one, touch typing. It is necessary that you're capable of touch typing properly and if you are like [i] was, it won't be easy. [i] have to admit, until then, [i] couldn't properly touch type, [i] was capable of what [i] would call, shit type. That means that [i] didn't need to look at the keyboard when typing and [i] was quite typing at a decent speed, but [i] did pick that up through random usage, not meticulous training. This, in practice, means that i wasn't clicking the correct keys with the correct fingers, my typing was erratic, and filled with hands movements. Let's say [i] was mostly using two-three fingers, and moving my hands a lot to cover all letters, symbols and macros. Given these conditions, "breaking" my keyboard in half wasn't as easy as [i] first thought, it would involved learning to touch type properly as well. The second biggest contributing factor is tenting the two halves outwards to help with pronation and avoid wrist extention. This is because when your hands are parallel to the typing surface two bones in your forearms, the ulna and the radius, rotates increasing pressure on your muscles and reducing circulation. This can cause strain and fatigue as you're not using a neutral pose, you're actually twisting your arms when you type all day. Try to drop your arms alongside your body, you'll quickly discover how more comfortable your resting position is compared to twisting your arms to have your palms looking backwards. By tilting your split keyboard, more and more perpendicular to the table you can alleviate the stress to your wrist and easily help with the wrist pain you might be experiencing. A good article about the subject can be found on the Kinesis website and [i] believe it's worth a read if you're interested.
benefit of a tented split keyboard
If you're searching for easy and quick typing pain relief these two solution could suffice, especially if you're a touch typer already, but [i] wasn't. That's why, my shift didn't stop there. Since [i] needed to learn how to touch type properly, [i] thought it would be worth exploring if learning to touch type the Querty layout was what [i] was looking out for. [i] did, before then, read a few articles on how Querty is outdated and inefficient in our digital age. Being designed in the late 19th century for typewriter usage is simply very inefficient when you can use all your fingers to type with. Since then a plentitude of other keyboard layouts were designed but for the better or for the worse Querty stuck in our society and it's simply too widespread for other layouts to even be considered as an alternative. [i], on the other hand, was faced with the decision of learning to touch-type with the old, inefficient but widespread layout that [i] was already accustomed to, or to pick a new layout and change that as well. "In for a penny" [i] thought and proceeded into learning all the various different layouts that were designed for different reasons. [i], of course, was puzzled, there are many good options for many different scopes then, after all, the original goal that lead me down this path guided this too, typing comfort. [i] decided to settle on Colemak, mostly cause it was designed with ergonomics in mind and ease of switch from Querty. But [i] didn't stop there, there's a niece recent version of Colemak that is designed with split keyboard in mind and involves a slight differences from the original layout, that's why [i] settled in learning the Colemak-DH layout. Now, you might possibly ask, what else? what else could there be to research for keyboards improvements. Well, remember when [i] mentioned [i] hated having to move my hands to use the mouse? Well, it turns out that my hatred is way more severe than that :). Silliness aside, on my research [i] read a lot about fingers, home-row placements and [i] did realize that having to move your hands and lose your resting position with the occasional mistyped character couldn't just by solved by changing keyboard layout. Of course Colemak tries to avoid hands movement as much as it can, but, after all, we're just talking about alphabet letters placements. There's way more to a keyboard, punctuation, numbers, function rows, macro and special keys. What [i]'ve quickly found out is that what [i] was looking for was less keys, in pure "less is more" [i] simply needed to remove as many keys as a possibly could, to be able to use my keyboard without having to ever move my hands, but just moving my fingers. This is quite subjective and there's a world to explore here in the custom split keyboard community, so it's difficult to recommend a good size, it really depends on preference, [i] suggest you to have a read, and maybe have a look at this wonderful resource on github by diimdeep. Now you might ask? so where are these keys going? Well, [i] will surely touch more on this later when [i] will run you through my keyboard setup, but for now, removing physical keys doesn't mean losing functionality, in most cases it actually means gaining more functionality. Generally these keys will be either moved to the thumbs, completely underutilized in classic keyboards and mostly moved to software. With the help of tap behaviours, macros, function keys and layers you will be able to have as many keys as you can possibly imagine, even more, you could actually design the behaviour or keys combination that a specific action or key will trigger. Like said, less is more.
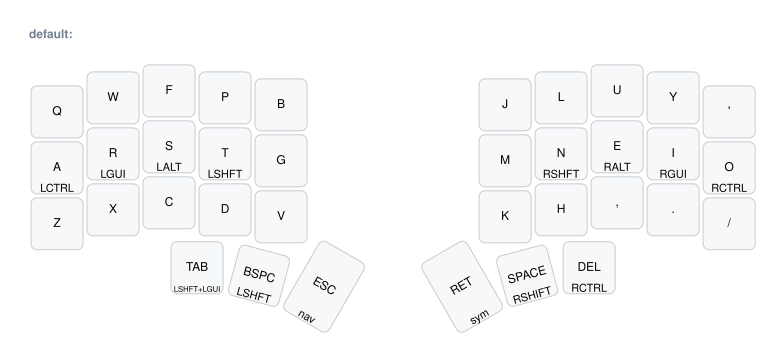
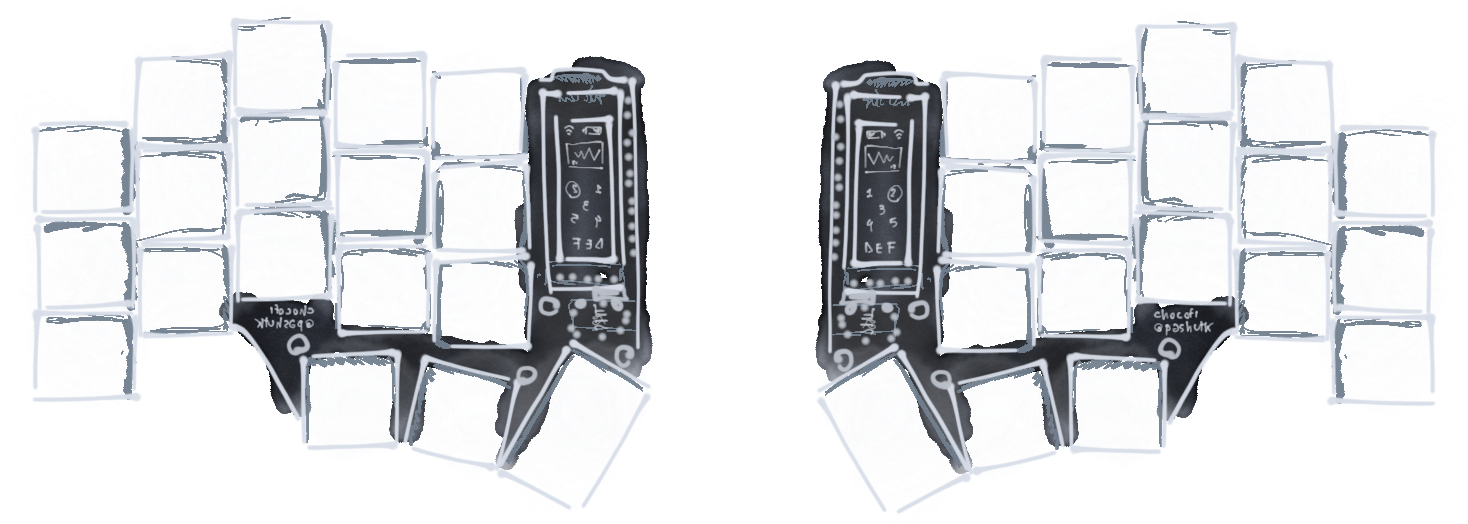
my current keyboard default layer
filmography tool
#sw #python #film
@quasi on 10/01/24
a while ago [i] was asked to do a presentation about my professional career, this meant having to prepare a few slides ... and in it a filmography one. The thought of having to search online for all the movie posters, resizing them and create a grid was as boring as the process would have been. That's why I decided to spend twice the amount of time to build this tool [i] am about to explain :).
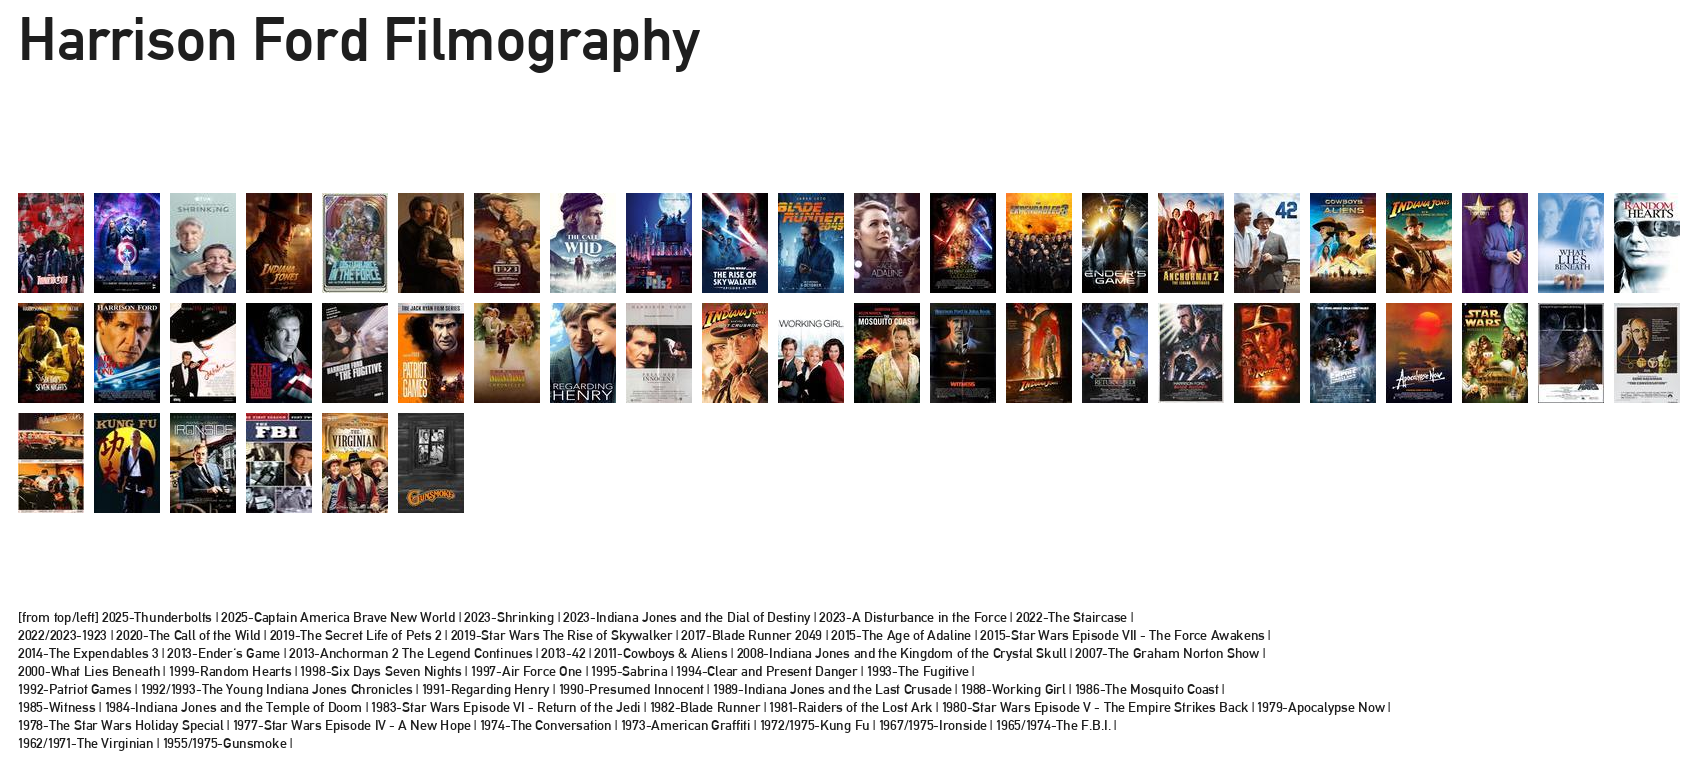
Harrison Ford 50 most popular shows in chronological order
grido is a little open source MIT licensed CLI tool with a very simple goal, search download and resize to the same height all the images found off an imdb advanced search page. This was the original goal, and also the current tool default behaviour, but a quick look at the help section will reveal that it is, in fact, way more capable then that. The tool, with a combination of flags, will allow the user to generate a complete grid.png image like shown here above. Now let's start with a guide on how to install it and how to use it.
if you're using any linux distros or macOs you're in luck as grido is built for unix-like CLIs, [i]'ve personally tested the tool on both platforms and should be working fine. If you're using Windows you might make it work under WSL but it is currently untested. Platform aside you only need to know how to open a command line in your system, and install python with your package manager of choice. If these basic prerequisites are satisfied then you can now follow the new steps.
clone the first step is to clone the repository locally on your computer, this just means you're going to copy the files needed for grido on your computer. After opening the command line choose where you would like to store the tool and cd to that location, the instruction here below will follow what [i] will do, but really it doesn't matter were you decide to place the tool.
	# make a dev directory to store the tool
	mkdir ~/dev
	# enter the directory
	cd dev
	# copy the tool
	git clone https://github.com/quasimontecarlo/grido.git
	# enter the folder
	cd grido
environment it's always a good idea to create a container when installing a new tool, this way all its dependencies won't interfere with your system. I generally use virtualenv for which [i] will provide the instructions for, but any other env/container system will work fine.
	# installing virtualenv to handle our environments
	python -m pip install virtualenv
	# creating our grido env
	python -m virtualenv grido_env
	# activating the env
	source grido_env/bin/activate

	### Archlinux ###
	sudo pacman -S python-virtualenv
	virtualenv -p /usr/bin/python3 grido_env
	source grido_env/bin/activate
requirements now that we have copied the repo and have set up our environment we can install all the dependencies. [i]'ve set up a simple .txt file to make this as easy as possible.
	# installing dependencies
	python -m pip install -r requirements.txt
learn Now that we have satisfied all the requirements we can learn how the tool works. Let's have a look at the help section of grido to start with, then we will discuss them more in depth.
	python grido.py --help
	'''
	usage: grido [-h] [-u URL] [-o OUT] [-s SIZE] [-l] [-c] [-d] [-g] [-gs GRIDSIZE] [-gnl GRIDNEWLINE] [-b] [-ko]

	this tools scrapes imdb advanced user search link, scrapes movie titles and year and searches images in duckduckgo, downloads them, and resizes them

	options:
	-h, --help            show this help message and exit
	-u URL, --url URL     the url link to imdb, default value $IMDBURL env variable
	-o OUT, --out OUT     the output location on disk where the images will be saved, default value $IMDBFOLDER env variable
	-s SIZE, --size SIZE  the height size in pxls, with will be calculated respectin the original aspect, default value 200
	-l, --list            if enabled provides the list of movies found
	-c, --crop            if enabled crops the width to the min width of the images found
	-d, --deform          if enabled deforms the width to the median width of the images found
	-g, --grid            if enabled creates a new image of a grid with all the images found inside
	-gs GRIDSIZE, --gridSize GRIDSIZE
						control the grid image size, default 1920x1080, to make it work please use format $Wx$H
	-gnl GRIDNEWLINE, --gridNewLine GRIDNEWLINE
						control when the movie list text goes to a new line, the value indicates after how many items there is a new line?, the value needs to be an integer
	-b, --bypass          if enabled bypass search and goes directly to the folder to resize
	-ko, --keepOriginals  if enabled stores the original images in a subfolder that the script will create
	'''
as previously stated the tool by default will scrape imdb advanced search page for movie titles, search for the posters on duckduckgo, download them and resize them all at the same height. Because of this it requires just two flags to work. The -u (--url) of the page it needs to scrape and the -o (--out) the folder where you want these images to be saved. If you often want to scrape the same page and want the images always in the same place you can also set up two env variables, $IMDBURL and $IMDBFOLDER, this will allow you to skip both flags as the tool will search the env variables if the flags are not provided. To customize the url you can simply click here and customize the field Cast or Crew like in the picture here below. After you have specified the person you can also further customize your search with the other fields.
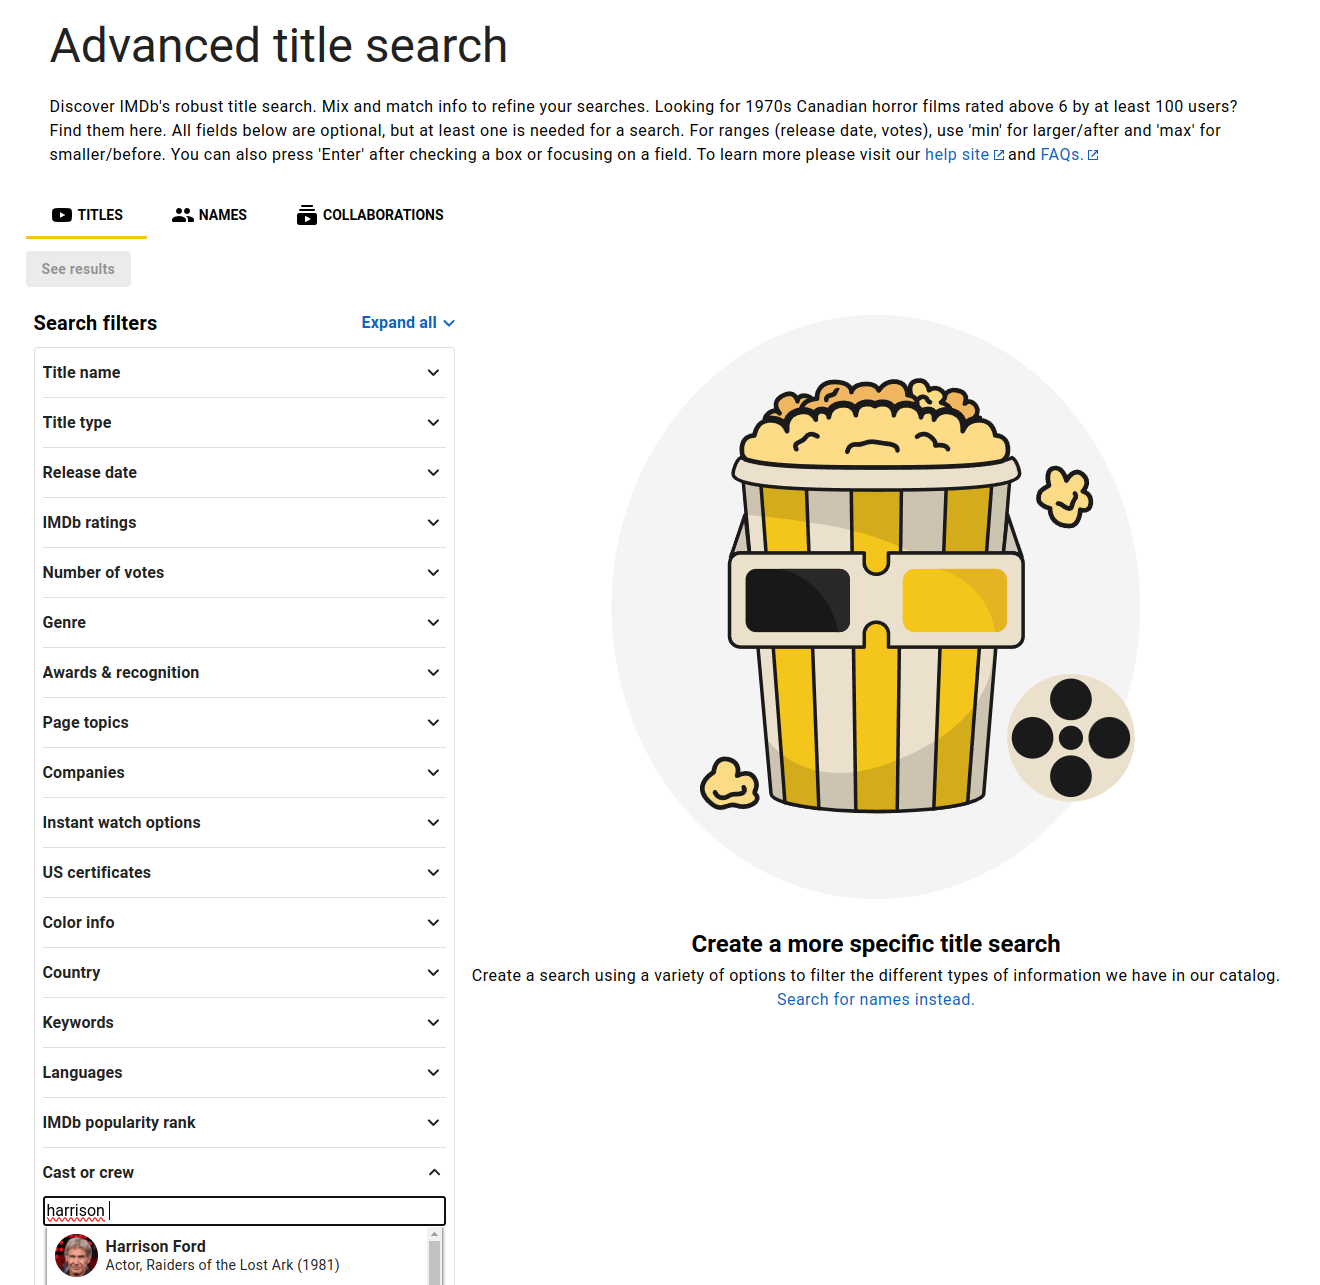
IMDB Advanced Search
once you have the link ready and chose the folder to place your downloaded images it's time to run grido.
	# note it's better to wrap the url with quotes
	# swap the url and folder with yours!
	python grido -u "https://www.imdb.com/search/title/?role=nm0000148" -o "~/Downloads"
flags alright, we have now all our images, let's then explore a more complex usage of the tool with the help of more flags.
-s | --size :: this flags allows the user to specify the height in pixels to which all images found will be conformed to. If not provided by the user a default the value of 200px will be used. This flag is extremely important when utilized with the grid flag. Every measure is driven by this size, [i]'ll explain a little more later. But what about the width? The tool have a couple of flags to deal with it, but if not specified the width will be derived by the height and maintain the original aspect ratio of each image, this means that the tool will conform just the height of all the images found, and the width will be different between them.
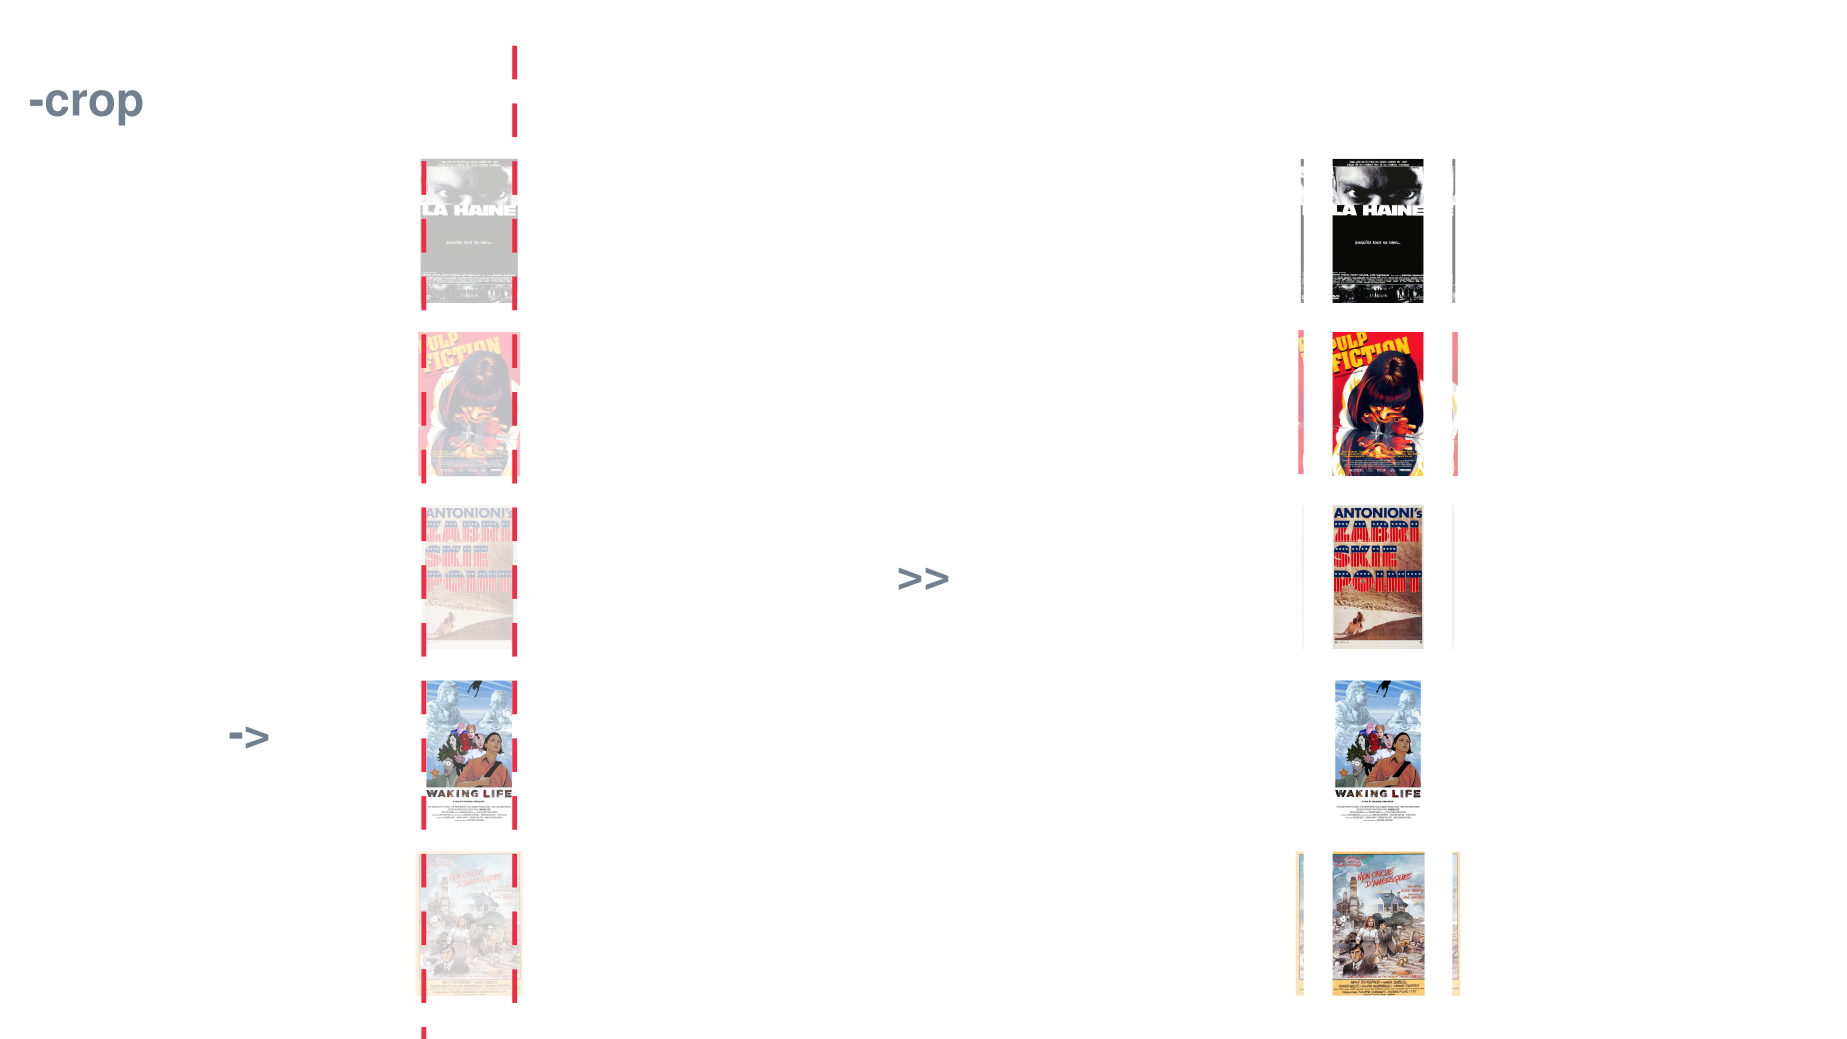
-c | --crop :: the crop flag deals exactly with the width problem. [i]'ve decided to include two ways to deal with conforming the width, so the user can choose the one that prefers. The crop flag will crop both left and right side of each image to the minimum width found between all the images. This basically means that crop conforms the width of all the images to the overall min width.
left strategy | right result
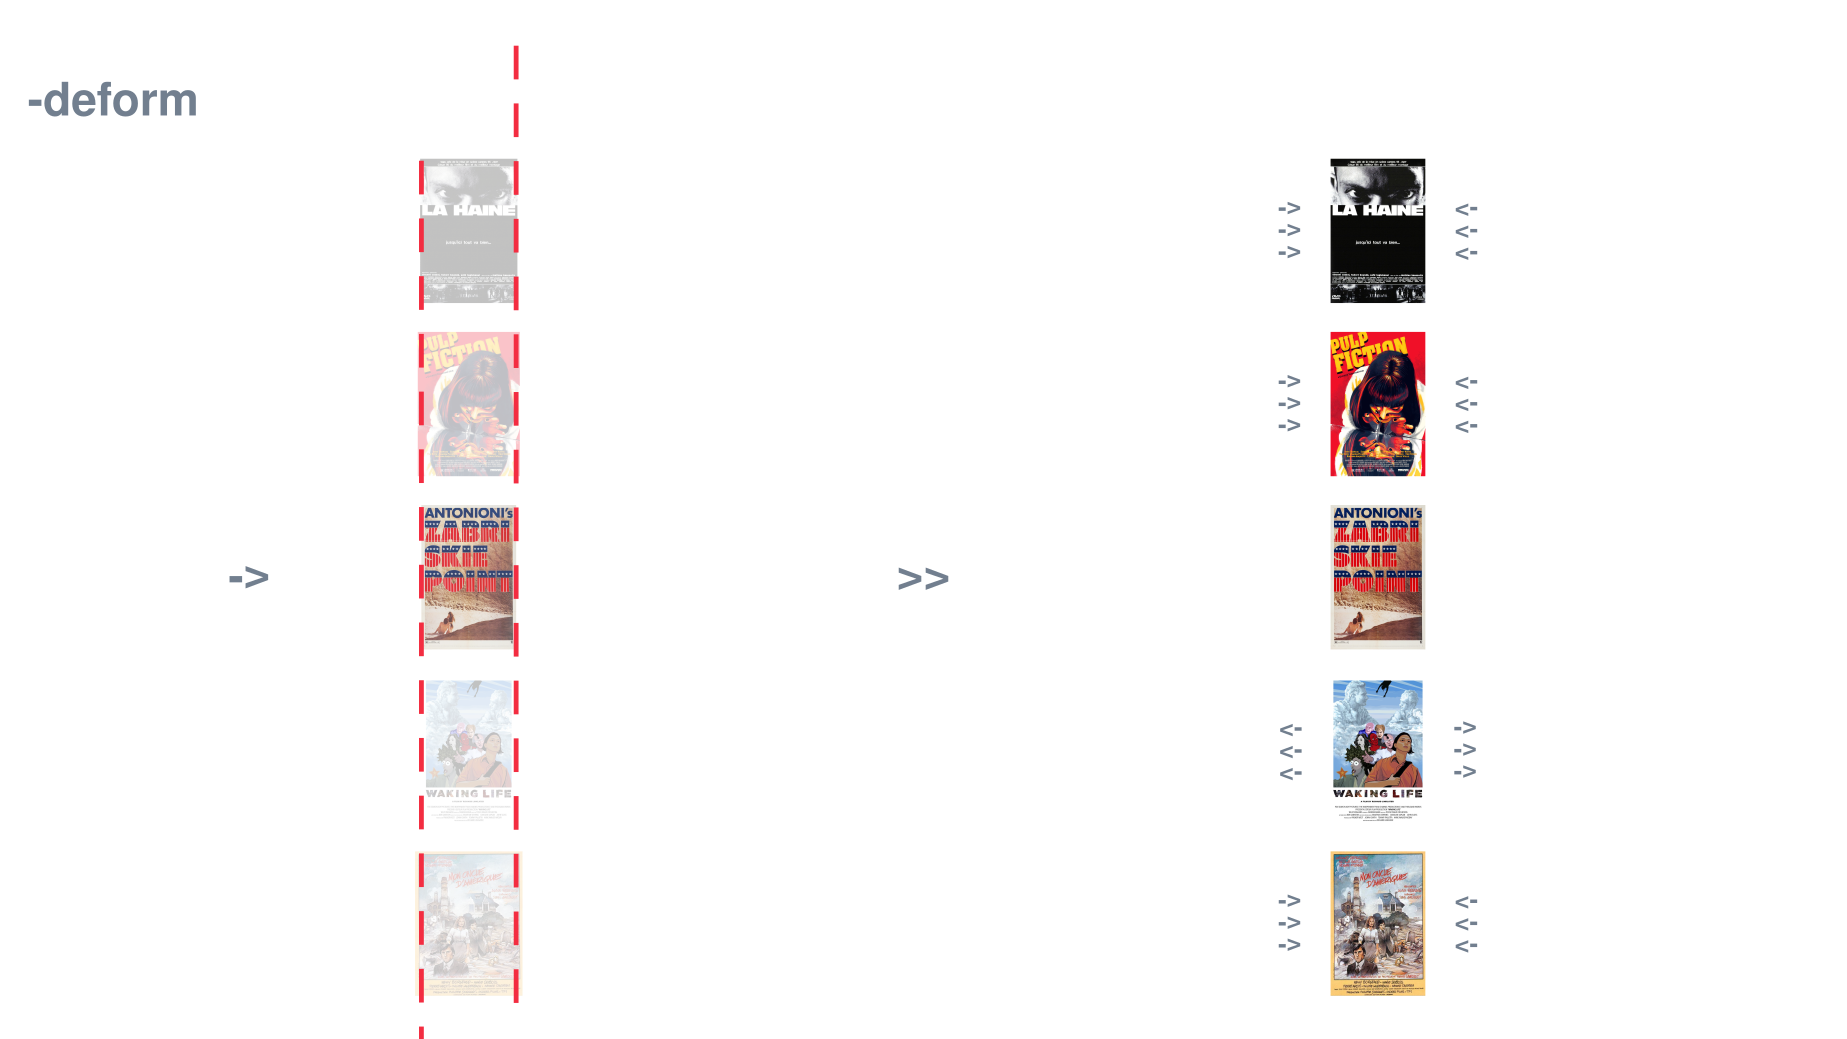
-d | --deform :: the deform flag instead doesn't cut portion of the images, but instead deforms them slightly to achieve the with conformity. One major difference between crop and deform is that instead of using the min width to deform to like crop does, it uses the median min width. This means that the deformation will be less dramatic as both the extremes will be ignored. Hopefully the picture here below will clarity any doubt on what this means.
left strategy | right result
-g | --grid :: once you choose how to conform the width of the images you will be able to use the grid flag. If your goal is to get the grid.png output you must have conformed your images with either method, this is because the grid works needs perfectly conformed images to be able to output a perfect grid. The grid flag is a boolean, it just activates the option but doesn't provide control over the grid. To control it there are several flags but mostly you can play with the size flag depending on how many items there are in your grid. As a tip [i] suggest you to set the size to 200 for roughly 25 items. For 50+ items [i]'ve found that values between 100-150 work well. Higher numbers are suggested for 15 or less items. Bare in mind that the grid will stop displaying items if you're asking for more items that can be fit in the grid, so don't be afraid and play around with the size flag to find your desired result.The grid will also include a title, it will order the items found chronologically and write a list with names and dates at the bottom. To achieve this [i] am using a font included in the font folder. [i] do not hold any rights over this font and was found online here.
-gs | --gridSize :: the grid size flag controls the height and width of the grid.png allowing the user to customize to specific resolutions. If not invoked it will use a default value of 1920x1080. This flag can be used in conjunction with size to avoid shrinking the items found size and allow for more of them to fit by using a larger final resolution. The only requirements for the flag to work is for the values to be entered with this format $WIDTHx$HEIGHT like shown here above with the default value.
-gnl | --gridNewLine :: the grid new line flag controls the amount of words before a new line break for the text at the bottom of the grid. [i]'ve decided to build this control in to leave the user a little bit of creative typographic direction over the final grid file. At times this flag can result useful, especially when dealing with either very few or tons of items and very long titles. Use is as you please and please remember to input only integer values. The default value if not invoked is 7, generally values around that number will work best.
-b | --bypass :: the bypass function is a funny one as it was mainly build for me to speed up the testing process of the grid/conform flags but then opened up a door for new workflows which made it a must keep when compiling the list of flags. The idea of it is to bypass the scrape/search/download portion of the script and just act on a folder of images. Basically you will want to use this flag if you've already downloaded all the images but want to conform them further, or want a different look for the grid. This flag will also come very handy to fix some of the images the tool might find. Since it is a completely automated workflow it could happen that the user might not like a specific poster that the tool found and grid. By using the bypass flag the user will be able to substitute the unwanted image with any other one of their choice. If you will rename the swapped image like the one you're swapping from the tool will also keep the naming convention and be able to place it chronologically. In short, the bypass flag is extremely useful to have some manual input in the grid creation, but could also be used to conform a total random number of images in a folder for a completely different scope.
-l | --list :: the list flag simply prints out in the command line a list of all the items found when scraping the url provided. It is a very quick way to get a list of movies for whatever scope, [i] use it all the time to very quickly answer the questions: "How many movies have you worked on?" | "Can you tell me which movies have you worked on?". Quite handy to have.
-ko | --keepOriginals :: the keep originals flag simply creates a subfolder in the location provided where it will store all the original images found without any conformation. This is super useful in case you're playing around with the size flag and resize everything a little too small. If you keep the originals you could simply copy those back in the main folder and run the tool with the bypass flag to keep testing without having to scrape again. Very useful flag that [i] always leave on, even if [i] end up not needing the original files, having them there will speed up the process in case of problems.
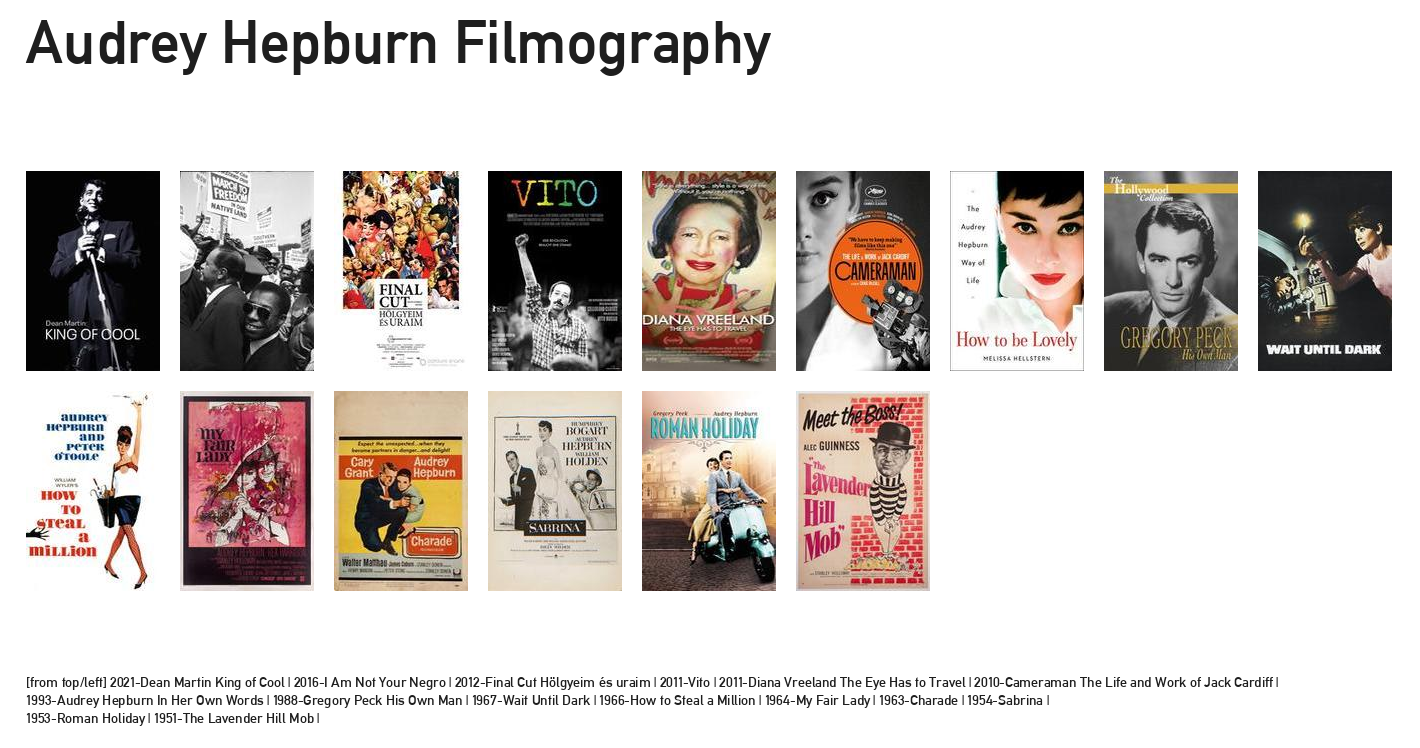
Audrey Hepburn movies with IMDB score higher then 7.5 in chronological order
examples To conclude [i]'d like to show a couple of examples to help with the flags usage, here below you can find the prompt [i]'ve used to generate the Harrison Ford image you can find at the beginning of this article and the Audrey Hepburn grid here above. Using these two examples as a base you can customize them with your url and folder and achieve your perfect grid. For any problem using the tool please open a github issue.
	## Harrison ##
	# because of the 50 elements the size flag is reduced
	python grido -s 100 -d -g -u "https://www.imdb.com/search/title/?role=nm0000148" -o "~/Downloads"
	## Audrey ##
	# notice how the size flag is bigger here as we only have 14 items to grid
	python grido -s 250 -d -g -u "https://www.imdb.com/search/title/?role=nm0000030&title_type=feature&user_rating=7.6," -o "~/Downloads"

	# as you can see both images used the deform method
o u t
modular journey
#music #sw #hw
@carol on 02/01/24
intro
[i] recall first hearing of the modular term quite a few years back, we were developing a sequence rendering engine at work and wanted to leverage The Foundry's Katana live group feature to automatically generate scenes to aid the vfx rendering process. Back then, I didn't fully realize the potential of this concept as [i] still intrinsically saw it just applied to that specific problem to solve. It was a bit later that [i] started to really understand the full meaning of it. As [i] develop through companies and positions [i] started to fully understand what the modular paradigm can bring. [i] had finally understood that modularity is a mean to simplify complex problems to its core, allow high customizability and interoperability within the system parts. Of course, as my nature commands, [i] did hear of modular synthesizers before then, but the whole impression of them seemed quite daunting. The myriads of cables, price and knowledge required to entry was still an obstacle to be reckoned with and [i] wasn't ready to take a step into it. It was just in recent times, after quite a long time since [i] first encountered the term, that [i] felt [i] was ready to welcome modularity on this side of my existence too.
[i] hope my evolving journey can help the reader understand the modular synth world and aid their first steps into it. There are plenty of resources online, way deeper than this text could be, as this is just a recollection of a journey from a novice. [i] am selfishly writing this for myself, to remind myself of the steps taken, of the links [i] shouldn't loose and simply cause [i] need to improve my written english. Despite my motifs being quite personal, if you're reading this, [i] hope you can find a tiny bit of this info useful for your journey too.
now, let's start
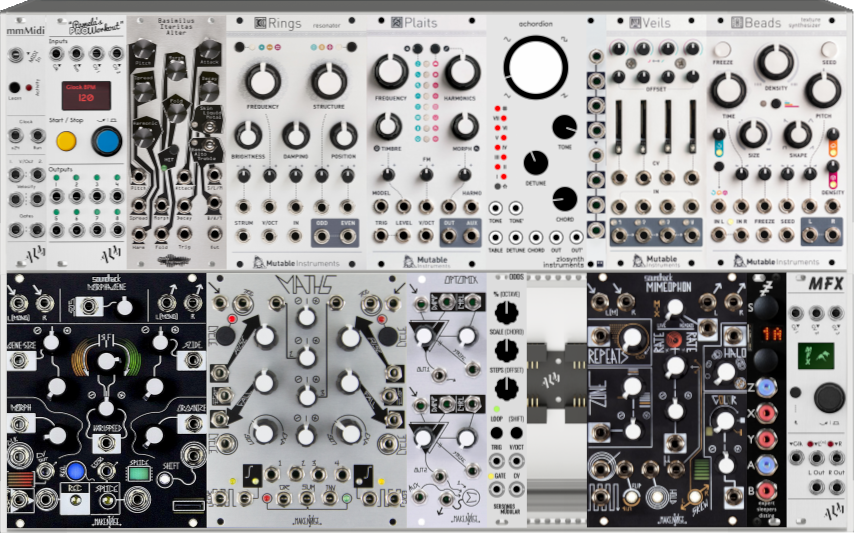
modulargrid.net rack_V02 temporary build
[i] can't recall when [i]'ve precisely heard of modular synthesizers, it must have been a long time ago, but, as explained here above, it was only quite recently that [i]'ve decided to add this instrument to my collections. To start i really needed to understand what they were, the price of modules is generally quite high and so [i] wanted to first do a huge amount of research, and not only on each module, or at least not at first, but on modular synthesis in general. [i] would suggest to start from perfect circuit's signal learning synthesis excellent set of articles. They aren't only useful for modular synthesis but for synthesis overall, [i]'ve then continued my research with various articles and youtube videos. [i] watched a huge amount that is difficult now to recall which one [i] recommend, just search for "building first modular rack". A couple of more resources are essential when planning your first build, in particular modulargrid. This super useful website will allow you to plan your rack ( my temp one is the image here above ) and provide clearance and price estimation for your build. Furthermore you can open a forum post about the build and ask for help/advice from other members. I think I couldn't have done it without this website so I highly recommend it. Another resource is modwiggler forum, full of great resources and guides and gives you the chance to ask questions to experts. All of this should get you started, understanding measurement terminology for cases and power/size constraints. Instead of quoting more sources [i] would like to sum up here what [i]'ve learned so far and provide a bunch of tips. Bare in mind that, as usual when talking about modularity, they aren't meant to be the absolute right thing to do. As with everything, there is not right or wrong, just different ways to see/approach a problem, you (and you alone) can speak about your needs, so feel free to take everything you hear/read as advice to carve your path. Unless you're planning to tour with your rack, choose/build the largest case you can, it doesn't matter if you can fill it all, or want to, having more space will allow you to expand your instrument in the future without having to swap modules or buy/build a new case. As you can see from the picture above I went for a 6U-84HP which is a decent compromise, it is not huge but also can fit quite a few modules. Choose what you want to build, since you're going to assemble your very own instrument you should have a clear goal in mind for what you want it to do. In my case I wanted to use the rack to both explore synth sound possibilities and have (of course ) to build a self playing random ambient machine. By defining your goals you can then further refine your search for knowledge, especially when researching the vastly deep world of modules. With my goal in mind [i] started to research more targeted subjects and started to build my first rack on modulargrid and opened a blog post, this allow me to gain more direct insights towards my goal and [i] planned the first version of my eurorack. Generally for a synth voice [i] understood that you mostly need an oscillator, vca, filter, mixer. In my case, the base [i] choose to start with was, clock/sequencer, oscillator, function utility, vca/mixer. Worth noting is an advice [i] saw everywhere and was given to me when discussing with more experienced users, don't go overboard with oscillators and focus on utility/modulation modules. This advice, for instance, [i] haven't followed much so far, which [i] think it's a good example of users goals trumps general advice. Some of the modules [i] choose in my rig are discontinued and [i] choose them as they represent historical modules. In this case, my nature of collector was stronger than the advice, [i] want to own a piece of history, but it's still important to know what one will do with those modules, [i] definitely won't store them in a box, they all have a purpose in my build. Same goes with other modules [i] bought used, sometimes a great deal comes by, and [i] am of course willing to change my plan for it, [i] am intending to build a random musical machine, it's only fair that its composition is influenced by random situations. To conclude, this article isn't over, [i] plan to keep adding to it, as my journey through modular synthesis has just begun, [i] will keep adding lessons [i]'ll learn along the way and add to this list of modules [i] own.
module
type
reason
If there's a lesson from all of this you should take away is that modularity is about both standards and customization; this means you, the user, have freedom. This freedom could be quite difficult to handle in this world where products, either physical or digital, are ready made full of assumption for you. But, if you will invest the time, there's nothing more rewarding than a journey where you need to research and study to assemble your very own product, you not only come out of it with a product that is tailor made by you, but enriched by the process too.
e n d ?
building a webpage
#sw #web #javascript #html #css
@quasi on ??/??/??
coming soon
drawing robots
#hw #axidraw
@timmin on ??/??/??
coming soon
assembling arch
#sw #dwm #st #suckless #archlinux
@quasi on ??/??/??
coming soon
music machines
#sw #hw #op-1 #norns #m8
@carol on ??/??/??
coming soon
algae: user defined entropy
#sw #gen_art #processing
@crltt on ??/??/??
coming soon